# VSCode你知多少
VSCode目前已经是前端人员必备的开发工具。本文介绍如何在VSCode调试、使用用户片段自定义模板等技巧。
# 一、调试
学会调试,是每一位开发人员必须学会的一个技巧,不仅能帮助我们快速定位问题,也助于熟悉业务复杂的项目。下面具体展开。
1、打开调试器,选择环境
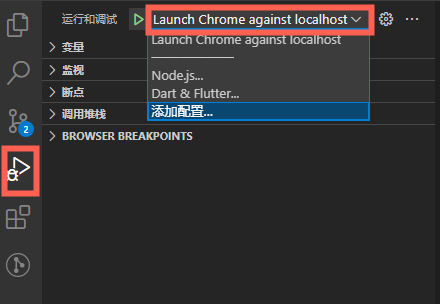
2、修改launch.json文件配置
当你的项目是Web项目,需要使用谷歌浏览器启动项目,可配置如下,
{
  "version": "1.0.0",
  "configurations": [{
	"name": "Launch Chrome",
	"request": "launch",
	"type": "chrome",
	"url": "http://localhost:8080",
	"webRoot": "${workspaceFolder}"
  }]
}
2
3
4
5
6
7
8
9
10
浏览器在无痕模式下,默认无法使用插件,若启用插件,找到更多工具->扩展程序->点击要应用的插件详情按钮,找到如图下的配置项,将其开启。

当你的项目是Node项目,可配置如下,
{
  "version": "1.0.0",
  "configurations": [{
	"name": "Launch Node",
	"request": "launch",
	"type": "node",
	"skipFiles": ["<node_internals>/**"],
	"program": "${workspaceFolder}/app.js"
  }]
}
2
3
4
5
6
7
8
9
10
其中,request字段值为launch时,表示VSCode连接前项目在调试模式下如何启动,值为attach时表示如何连接VSCode调试器到运行中的项目。
传送门:
- 启动文件配置属性介绍 (opens new window)
- 启动文件可用变量介绍 (opens new window)(其中有一种输入变量用于tasks.json,它可以代替终端命令变可视化操作)
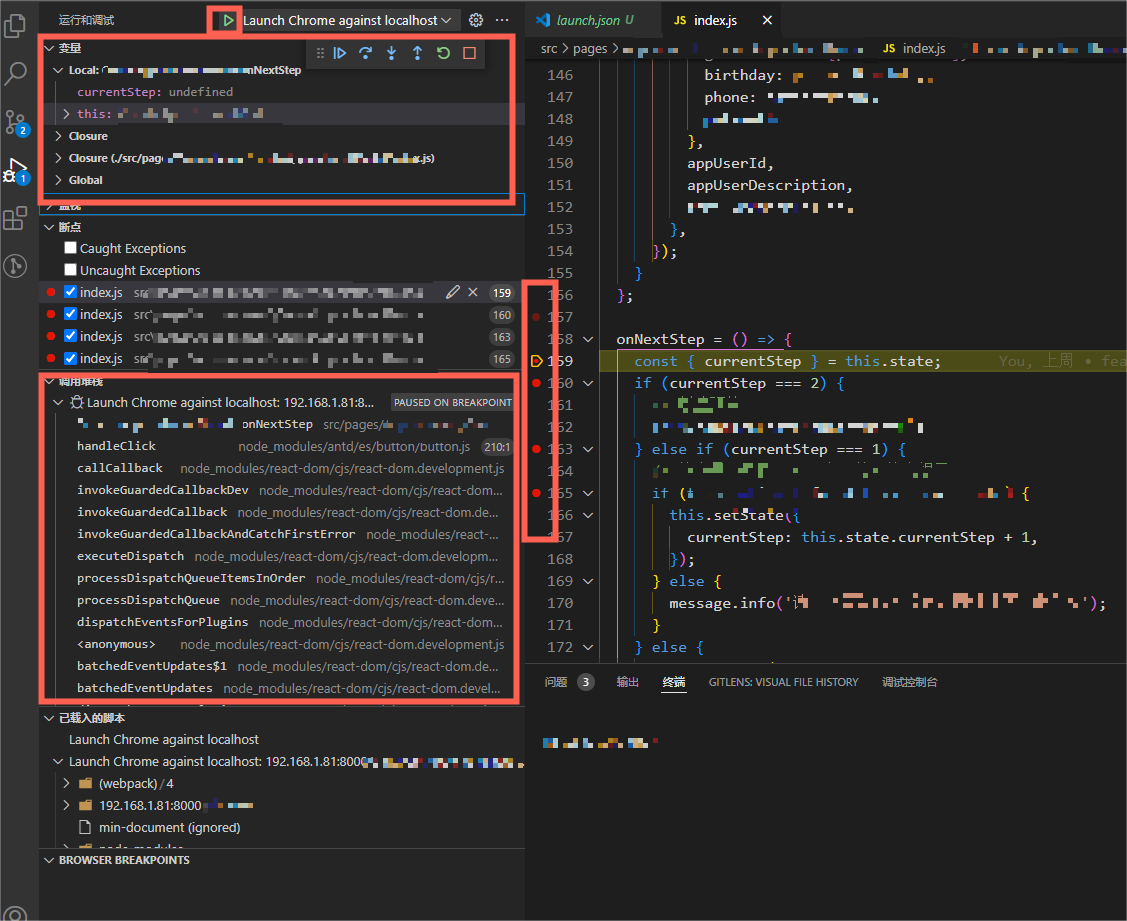
3、点击启动,设置断点,查看变量和堆栈,根据需要选择继续、单步跳过、单步跳入、跳出操作。
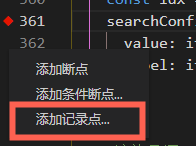
断点支持执行指定的表达式,设置命中次数时中断,在调试终端打印信息

# 二、用户片段
用户片段,让开发者可以自定义一些常用模板,帮助我们一键生成,提升效率。
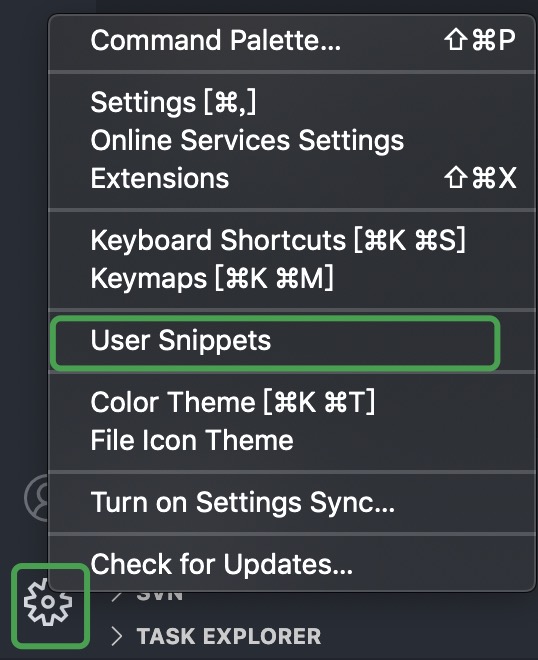
首先,点击设置,再点击User Snippets
接着,点击New Global Snippets file...
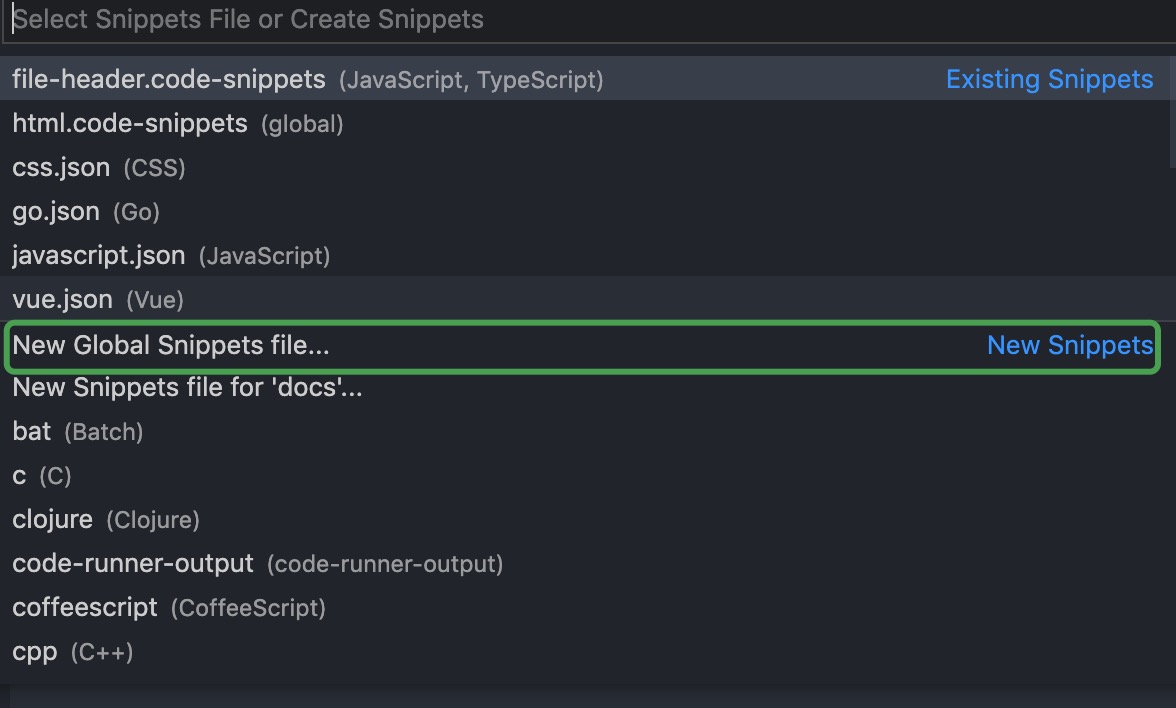
之后,可以开始自定义常用的模板了。我们知道,移动端页面通常会比PC端多一些元数据配置,下面就以H5模板为例,
{
	// Place your global snippets here. Each snippet is defined under a snippet name and has a scope, prefix, body and
	// description. Add comma separated ids of the languages where the snippet is applicable in the scope field. If scope
	// is left empty or omitted, the snippet gets applied to all languages. The prefix is what is
	// used to trigger the snippet and the body will be expanded and inserted. Possible variables are:
	// $1, $2 for tab stops, $0 for the final cursor position, and ${1:label}, ${2:another} for placeholders.
	// Placeholders with the same ids are connected.
	"Print to console": {
		"prefix": "mhtml",
		"scope": "html",
		"body": [
			"<!DOCTYPE html>",
			"<html lang='zh'>",
			"<head>",
			"  <meta charset='UTF-8'>",
			"",
			"  <!-- 表示视口宽度为设备宽度,初识比例为1,最小比例为1,最大比例为1,不允许用户缩放页面 -->",
			"  <meta name='viewport'",
			"    content='width=device-width,initial-scale=1.0,minimum-scale=1.0,maximum-scale=1.0,user-scalable=0'>",
			"",
			"  <!-- 表示设备对页面中的出现数字不识别为电话号码、日期、电邮、地址 -->",
			"  <meta name='format-detection' content='telephone=no,email=no,date=no,address=no'>",
			"",
			"  <!-- 浏览器兼容性处理,表示强制IE按Edge渲染,当浏览器使用谷歌浏览器内嵌框架时允许其使用该框架进行渲染 -->",
			"  <meta http-equiv='X-UA-Compatible' content='IE=edge,chrome=1'>",
			"",
			"  <!-- 表示全屏 -->",
			"  <meta name='full-screen' content='yes'>",
			"  <meta name='x5-fullscreen' content='true'>",
			"",
			"  <!-- 表示始终保持竖向,不能横向 -->",
			"  <meta name='screen-orientation' content='portrait'>",
			"  <meta name='x5-orientation' content='portrait'>",
			"",
			"  <!-- 表示允许全屏模式浏览 -->",
			"  <meta name='apple-mobile-web-app-capable' content='yes' >",
			"",
			"  <!-- 表示顶端状态条的样式,默认值为default(白色),也可以设置为black(黑色)和black-translucent(灰色半透明) -->",
			"  <meta name='apple-mobile-web-app-status-bar-style' content='black'>",
			"",
			"  <!-- 网页添加到主屏显示的图标,前者有圆角高光修饰,后者则没有 -->",
			"  <link rel='apple-touch-icon-precomposed' href=''>",
			"  <link rel='apple-touch-startup-image' href=''>",
			"",
			"  <title></title>",
			"</head>",
			"<body>",
			"",
			"</body>",
			"</html>",
		],
		"description": "移动Web HTML模板初始化"
	}
}
2
3
4
5
6
7
8
9
10
11
12
13
14
15
16
17
18
19
20
21
22
23
24
25
26
27
28
29
30
31
32
33
34
35
36
37
38
39
40
41
42
43
44
45
46
47
48
49
50
51
52
53
54
其中,prefix字段是我们快捷生成片段的前缀提示,scope字段是片段前缀有效的文件类型范围,多种文件类型用逗号隔开即可,body字段则是片段的具体内容,是一个数组,每个元素代表片段的每一行内容,description字段表示对该片段的说明。
最后,在创建的HTML文件上输入mhtml,会出现提示菜单,选择它并回车,即立即生成片段。
当然,如果想要删除该片段,在打开的用户片段文件的Tab上右击,选择Reveal in Finder(这里是MacOS),会跳转到该文件在文件系统上的位置,然后删除该文件即可。
# 结束语
VSCode提供的便利功能不止于此,还有设置同步、Emmet等实用功能,后续会再更新篇幅。
