# 快速搭建脚手架
# 脚手架能做什么
就我所知,脚手架的用途大多是用来实现项目创建、启动、开发、构建、部署过程中的自动化,减少开发的重复工作。拿我们前端三大框架各自提供的脚手架举例,即create-react-app (opens new window)、create-vue(vue新脚手架) (opens new window)、@vue/cli(vue旧脚手架,现只做维护) (opens new window)和@angular/cli (opens new window),可以看看它们都提供了哪些命令和选项。
- create-react-app脚手架提供创建模板的相关选项,功能较单一:

- @vue/cli脚手架提供了项目创建、启动、构建、配置、插件等相关命令:

- @angular/cli脚手架提供的命令则相对完善:

# 脚手架入门实现
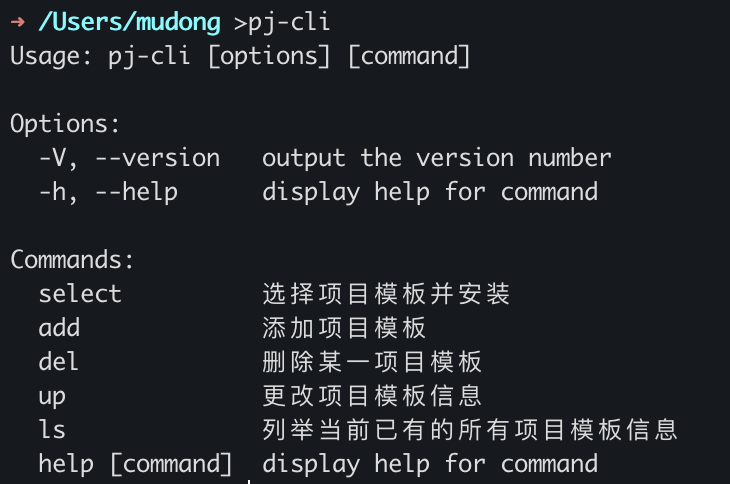
我们通过实现集合开发常用的项目模板,提供选择模板、添加模板、删除模板、更新模板、查看模板列表5个命令的功能,以此来熟悉脚手架的开发。
# 1、创建项目,搭好基础结构
通过
npm init -y初始化一个空项目创建bin文件夹,新建index.js文件,第一行内容声明如下,表明该脚本是一个node脚本
#!/usr/bin/env node1package.json添加配置
"bin": {
  "pj-cli": "./bin/index.js"
},
"scripts": {
  "link": "npm link"
},
1
2
3
4
5
6其中,bin指定脚手架名称及其命令入口位置,scripts添加一个软连接命令,当执行npm run link命令,全局创建一条软连接,指向命令的当前路径,执行脚本。
# 2、安装依赖,初始化脚手架
要安装的依赖主要是commander、inquirer这两个。其中,inquirer包也可以改用prompts包 (opens new window)(自己虽然未用过,但看create-vue使用了它)。
初始化脚手架的大体思路分三步,添加命令、解析命令、监听命令。核心代码如下,
#! /usr/bin/env node

const commander = require('commander');
const {
  addCommand,
  printHelp
} = require('../src/helper');
const commands = require("../src/commands/index");

async function init() {

  // 1、添加命令
  for (let key in commands) {
    addCommand(commands[key]);
  }

  // 2、解析命令
  commander.parse(process.argv);

  // 3、监听错误命令事件
  commander.on('command:*', function() {
    printHelp();
  });
}

init();
2
3
4
5
6
7
8
9
10
11
12
13
14
15
16
17
18
19
20
21
22
23
24
25
26
# 3、封装辅助工具
在第二步,我们已经看到是借助了一些辅助函数快速实现,所以这步是封装好这些工具,包括添加命令、打印帮助信息、以及后面用到的prompt二次封装、异常处理等函数
const commander = require('commander');
const inquirer = require('inquirer');
const chalk = require('chalk');

// 添加命令
function addCommand(param = {
  cmd: "",
  alias: "",
  desc: "",
  action,
}) {

  const {
    cmd = '',
    alias = '',
    desc = '',
    action,
  } = param;
  // 给命令操作起名称、别名、描述
  const commanderRef = commander.command(cmd).alias(alias).description(desc);

  // 给命令绑定执行动作
  const type = toString.call(action);
  switch (type) {
    case "[object Function]":
      commanderRef.action(action);
      break;
    case "[object Array]":
      for (let item of action) {
        commanderRef.option(...item.option);
        commanderRef.action(item.action);
      }
      break;
    default:
      break;
  }
}

// 打印帮助信息
function printHelp() {
  commander.help((info) => {
    console.info(info);
    return "请根据以上提供的的选项或命令使用工具。\r\n";
  });
}

// prompt二次封装
function promptPromise(question) {
  return new Promise((resolve, reject) => {
    inquirer.prompt(question).then((res) => {
      resolve({
        state: 'success',
        data: res
      });
    }).catch(err => {
      // 拦截错误
      resolve({
        state: 'error',
        err,
      });
    });
  })
}

// 错误统一处理
function handleException(err) {
  console.log(chalk.red.bold('程序出现异常,请重新执行'));
  process.exit(1);
}
2
3
4
5
6
7
8
9
10
11
12
13
14
15
16
17
18
19
20
21
22
23
24
25
26
27
28
29
30
31
32
33
34
35
36
37
38
39
40
41
42
43
44
45
46
47
48
49
50
51
52
53
54
55
56
57
58
59
60
61
62
63
64
65
66
67
68
69
# 4、实现一个命令操作,以select为例
select命令功能是先询问选择哪种应用场景,再询问某场景下哪种项目模板,最后确认后开下载模板。
const inquirer = require('inquirer');
const autocomplete = require('inquirer-autocomplete-prompt');

const {
  promptPromise,
  handleException,
} = require('../helper');

// 问题配置
const {
  selectScene,
  selectTpl,
} = require('../config/questions');

function setUpTpl(tpl) {
  // 安装项目模板...
}

async function handleTpl(scene) {
  // 获取模板...
}

async function handleScene() {
  // 获取应用场景...
}

async function handleSelectAction() {
  // 支持输入自动补全
  inquirer.registerPrompt('autocomplete', autocomplete);

  // 获取应用场景,如MVVM应用、集成客户端应用、SSR应用等
  await handleScene();
  // 询问应用场景
  let res = await promptPromise([selectScene]);

  if (res.state === 'success') {
    // 获取模板,如应用场景选择了集成客户端应用,则模板有Dva、Umi等
    await handleTpl(res.data.scene);
    // 询问模板
    res = await promptPromise([selectTpl]);

    if (res.state === 'success') {
      // 安装项目模板
      setUpTpl(res.data.projTpl);
    } else {
      handleException(res.err);
    }
  } else {
    handleException(res.err);
  }
}

module.exports = {
  cmd: "select",
  desc: "选择项目模板并安装",
  action: function() {
    handleSelectAction();
  },
}
2
3
4
5
6
7
8
9
10
11
12
13
14
15
16
17
18
19
20
21
22
23
24
25
26
27
28
29
30
31
32
33
34
35
36
37
38
39
40
41
42
43
44
45
46
47
48
49
50
51
52
53
54
55
56
57
58
59
其他命令的实现亦是类似,举一反三嘛。
# 5、执行npm run link,调试查看效果
链接调试无误后,结果如图,

至此,一个基本的脚手架开发流程就算完结了。
以上只是大致讲了主体流程,完整源码放在这里 (opens new window),可以点击查看更多细节。
# 写在最后
其实我们还可以利用脚手架把日常开发中易忘而又有用的点或者操作整合记录起来,后续需要用到的话,直接终端手敲命令就都出来了,十分提效。这个作业就留给各位下来实践了!!!
